

How To Change Hidden_field_tag Name With Jquery
With SharePoint we utilise a lot of lists and libraries to store and share information, nosotros add and change this information with the help of forms. In most cases we create ane form with all the data required for the content. Even if not all the information is required for all types of content or if it depends on a phase or condition. With the help of jQuery and JavaScript we can create a more dynamic form that volition hide/bear witness fields based on selected values of fields. Brand certain to disable the quick option, otherwise user will be able to edit the field exterior of the provided solution.
SharePoint 2013/Online: Disable Quick edit
- Open up the listing or library settings
- Open the Advanced settings

- Set Quick Edit to No
SharePoint 2010: Disable Datasheet editing
- Open the list or library settings
- Open the Advanced settings

- Ready Datasheet to No
JavaScript: New Form
- Open your favorite JavaScript Editor.
- Create a new JavaScript file called NewFormHideShow.js
- Add together the following base code to the JavaScript file.
$( document ).ready(function() { } );
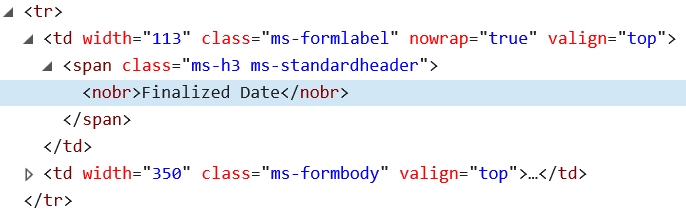
- The first step is to hide the columns. Find the brandish names of the field that need to exist subconscious. Note that you need the proper name located in the HTML nobr tag.
- Y'all tin can apply a DOM explorer to find the correct names.
- For each field add together the post-obit code.
$('nobr:contains("[Field Proper noun]")').closest('tr').hide();
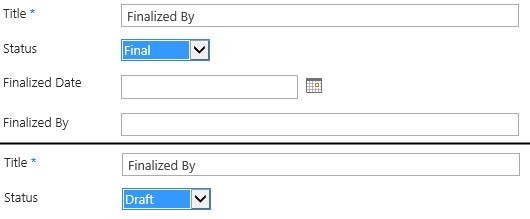
- In my instance I hide two fields, Finalized Date and Finalized Past. My example code for the document ready office is shown below.
$(document).ready(office() { $('nobr:contains("Finalized Engagement")').closest('tr').hide(); $('nobr:contains("Finalized By")').closest('tr').hibernate(); });
- The second step is to brand the function that hides or shows the fields depended on the selected value.
- Add the post-obit code to the JavaScript.
(function($){ function showHideRegionLocation() { var FeedbackMatchingValue = 'Terminal'; var thisDiv = $("select[title='Status']"); var mmFieldValue = thisDiv.discover("pick:selected").text(); $('nobr:contains("Finalized Date")').closest('tr').hide(); $('nobr:contains("Finalized Past")').closest('tr').hibernate(); if (mmFieldValue.indexOf(FeedbackMatchingValue) > -1) { $('nobr:contains("Finalized Date")').closest('tr').evidence(); $('nobr:contains("Finalized By")').closest('tr').show(); } }
- Set the var FeedbackMatchingValue to the value which will prove the hidden fields.
- Set up the var thisDiv to the proper name of the Field that is used to show/hide the fields. Note that different types are just for different columns example Select or Input.
- Add the hide and Show codes. The code hides or show the table row (tr).
- Add the last part to the code. This part makes sure the functions runs when a users selects and/or reselects the choice.
$(certificate).set(function() { $("select[id^='Condition'").on('mistiness', showHideRegionLocation).on('modify', showHideRegionLocation); });
})(window.jQuery); - Alter the value subsequently id^ to the field that contains the value on which field are being shown/hidden.
- The final code looks like this.
$(document).ready(role() { $('nobr:contains("Finalized Appointment")').closest('tr').hide(); $('nobr:contains("Finalized Past")').closest('tr').hibernate(); }); (function($){ office showHideRegionLocation() { var FeedbackMatchingValue = 'Final'; var thisDiv = $("select[championship='Condition']"); var mmFieldValue = thisDiv.find("selection:selected").text(); $('nobr:contains("Finalized Date")').closest('tr').hide(); $('nobr:contains("Finalized By")').closest('tr').hide(); if (mmFieldValue.indexOf(FeedbackMatchingValue) > -1) { $('nobr:contains("Finalized Date")').closest('tr').show(); $('nobr:contains("Finalized By")').closest('tr').bear witness(); } } $(certificate).fix(function() { $("select[id^='Status'").on('blur', showHideRegionLocation).on('change', showHideRegionLocation); }); })(window.jQuery);
JavaScript: Edit Form
- The edit form is virtually completely the same, but the last function is different.
- Open your favorite JavaScript Editor.
- Create a new JavaScript file chosen EditFormHideShow.js
- Follow the steps 3 – 12 from the chapterJavaScript: New Form.
- Add the final function to the code. This part makes certain the functions runs when a users selects and/or reselects the option.
$(certificate).ready(function() { setTimeout(function() { showHideRegionLocation(); }, m); $("select[id^='Status'").on('mistiness', showHideRegionLocation).on('change', showHideRegionLocation); }); })(window.jQuery);
- Change the value after id^ to the field that contains the value on which field are being shown/hidden.
- The terminal code looks similar this.
$(document).ready(office() { $('nobr:contains("Finalized Appointment")').closest('tr').hibernate(); $('nobr:contains("Finalized By")').closest('tr').hibernate(); }); (role($){ function showHideRegionLocation() { var FeedbackMatchingValue = 'Concluding'; var thisDiv = $("select[title='Condition']"); var mmFieldValue = thisDiv.find("choice:selected").text(); $('nobr:contains("Finalized Engagement")').closest('tr').hide(); $('nobr:contains("Finalized By")').closest('tr').hibernate(); if (mmFieldValue.indexOf(FeedbackMatchingValue) > -1) { $('nobr:contains("Finalized Engagement")').closest('tr').show(); $('nobr:contains("Finalized By")').closest('tr').show(); } }
$(document).set(role() { setTimeout(part() { showHideRegionLocation(); }, grand); $("select[id^='Condition'").on('blur', showHideRegionLocation).on('change', showHideRegionLocation); }); })(window.jQuery);
Calculation JavaScript to a class
- Open the edit and/or new form of the list.
- Set the form in edit mode
- Add together the Script Editor Web Office to the folio
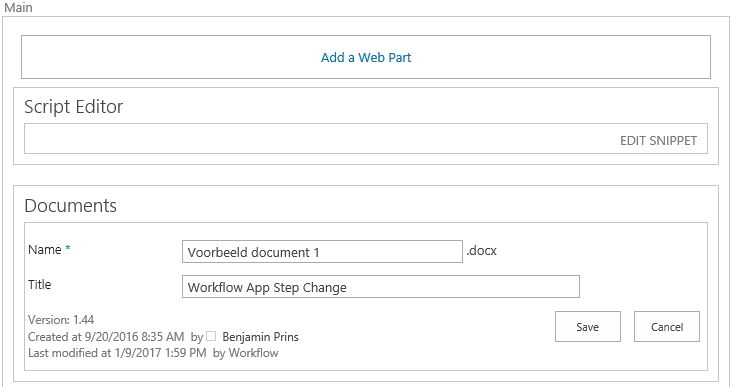
- Edit the SNIPPET and add the post-obit lawmaking.

<script src= "../../SiteAssets/Organization/jquery-3.1.i.min.js" type= "text/javascript" ></script> <script src= "../../SiteAssets/System/EditFormHideShow.js" type= "text/javascript" ></script>
- Insert the code en Stop editing the class.
- Relieve the custom JavaScript HideColumns and the jQuery script in the correct location.
- The JavaScript volition now run and hide or shows the field based on the selected value of the field Status.
Source: https://www.benprins.net/2017/03/01/javascript-jquery-hideshow-fields/
Posted by: friendhintailging.blogspot.com
0 Response to "How To Change Hidden_field_tag Name With Jquery"
Post a Comment